Snake plants (Sansevieria) are among the easiest houseplants to care for, but over time, they need repotting to maintain healthy growth. Repotting refreshes the soil, prevents root crowding, and improves drainage, ensuring your plant thrives.
How to Repot a Snake Plant
To repot a snake plant, gently remove it from its current pot, shake off excess soil, and inspect the roots. Trim any damaged roots, place the plant in a slightly larger pot with well-draining soil, and fill in the gaps. Water lightly and allow it to adjust in a bright, indirect light spot.
Why Repotting a Snake Plant is Important
Over time, snake plants can become root-bound, depleting the nutrients in their soil and restricting growth. Repotting helps refresh nutrients, prevent root rot, and improve drainage, leading to a healthier and more vibrant plant.
Signs Your Snake Plant Needs Repotting
Knowing when to repot is crucial. Here are key indicators:
- Roots growing out of drainage holes – A clear sign that the plant has outgrown its pot.
- Slow or stunted growth – If your plant isn’t producing new leaves, it might be struggling in compacted soil.
- Cracked or distorted pot – Strong roots can exert pressure on the pot, causing it to crack.
- Poor drainage leading to soggy soil – Overly compacted or depleted soil retains excess moisture, which can cause root rot.
Best Time to Repot
The ideal time to repot is in spring or early summer when the plant is actively growing. This helps minimize transplant shock and encourages faster root development.
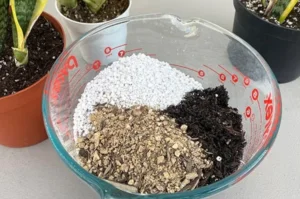
Choosing the Right Soil for a Snake Plant
Well-draining soil is essential to prevent root rot. You can use a succulent or cactus mix, or blend potting soil with sand and perlite for improved aeration. For those mixing their soil, consider a blend like two parts potting mix, one part coarse sand, and one part perlite.
This soil calculator tool can help you estimate how much soil you’ll need when repotting into a new container.
Selecting the Best Pot for Repotting
Choosing the right pot is crucial for proper drainage and root health. The best options include:
- Terracotta pots (absorb excess moisture, reducing overwatering risk)
- Ceramic or plastic pots (ensure proper drainage holes)
- A size increase of 1-2 inches (prevents excessive soil moisture retention)
Step-by-Step Guide to Repotting a Snake Plant
Before repotting, it’s important to prepare the plant carefully by inspecting the roots. Here’s a breakdown of the steps:
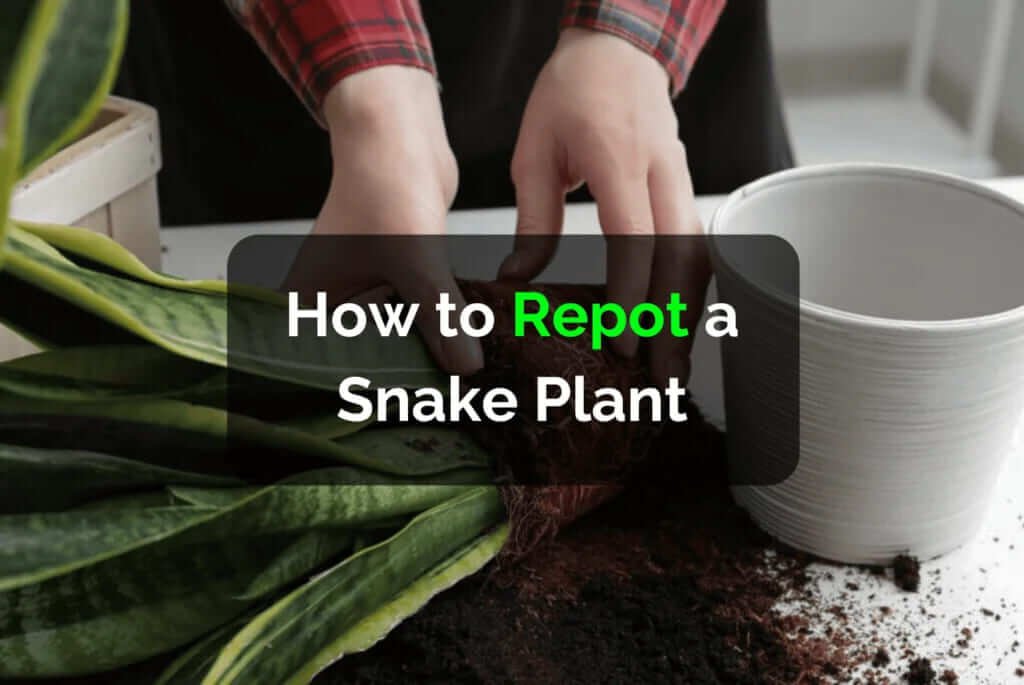
1. Remove the Snake Plant from Its Pot
Gently tilt the pot sideways and grasp the base of the snake plant. If it’s stuck, tap the sides of the pot or use a knife to loosen the soil around the edges.
2. Shake Off Excess Soil and Inspect the Roots
Carefully shake off old soil to expose the roots. Check for mushy or rotting roots and trim them with sterilized scissors.
3. Prepare the New Pot
Add a thin layer of fresh soil at the bottom of the new pot. This helps position the plant at the correct height.
4. Position and Fill the Pot
Place your snake plant in the center, ensuring it’s at the same depth as before. Fill the pot with fresh potting mix, pressing it lightly to eliminate air pockets.
5. Water Lightly and Let It Settle
After repotting, water thoroughly but do not soak the soil. Let excess water drain out completely.
6. Resume Normal Care
Place the plant in indirect sunlight and allow the soil to dry out between waterings. Avoid fertilizing for 2-3 weeks to prevent root stress.

Common Repotting Mistakes to Avoid
- Choosing a pot that’s too large – Excess soil holds moisture, increasing the risk of root rot.
- Using dense, moisture-retaining soil – A well-draining mix is key.
- Overwatering after repotting – Water moderately to avoid stress.
Aftercare Tips
- Watering: Let the soil dry between waterings to avoid root rot.
- Light conditions: Keep the plant in bright, indirect light for optimal recovery.
- Fertilizing: Wait at least four weeks before fertilizing after repotting.
- Adjustment period: Expect slight transplant shock for a few weeks before new growth appears.
By following these steps, your snake plant will continue to thrive with strong, healthy growth. Happy repotting!