Snake plants, scientifically known as Sansevieria (though increasingly classified as Dracaena trifasciata), are celebrated for their striking upright foliage and remarkable resilience. Their ability to tolerate neglect and thrive in various conditions has made them a beloved choice for both novice and experienced plant enthusiasts. Beyond their aesthetic appeal and air-purifying qualities, maintaining the health and vigor of your snake plant often involves a fundamental practice: pruning. While generally low-maintenance, understanding the nuances of how to prune a snake plant safely is crucial for promoting healthy growth, maintaining an attractive shape, and even expanding your green collection. This comprehensive guide will walk you through the essential steps, ensuring you can confidently and effectively prune your snake plant.
Why is Pruning Important for Your Snake Plant?
Pruning your snake plant goes beyond simple aesthetics; it plays a vital role in the plant’s overall well-being. By strategically trimming your Sansevieria, you can address several key needs:
- Removing Damaged or Diseased Foliage: Overwatering, underwatering, or physical damage can lead to unsightly and unhealthy leaves. Prompt removal of yellowing, brown-tipped, wilting, or diseased leaves prevents these issues from escalating and potentially affecting the rest of the plant. This also improves air circulation around the plant, reducing the risk of fungal infections. Understanding the specific benefits of pruning, from maintaining the plant’s health to encouraging new growth, can make the process more meaningful. We explore these advantages in more detail in our article on why we should prune a snake plant.
- Controlling Size and Shape: Snake plants can sometimes grow quite tall or develop leggy growth, especially in lower light conditions. Pruning allows you to maintain a desired size and shape, preventing the plant from becoming unruly or outgrowing its designated space.
- Encouraging Healthy New Growth: Removing older or overcrowded foliage redirects the plant’s energy towards producing fresh, vibrant new leaves. This results in a fuller, more robust plant over time.
- Facilitating Propagation: A significant benefit of pruning snake plants is the opportunity to propagate new plants from the healthy leaf cuttings. This allows you to expand your collection or share these easy-to-care-for plants with friends and family.
When is the Best Time to Prune Your Snake Plant?
Timing is key when it comes to pruning to minimize stress and maximize the plant’s recovery. The ideal time to prune your snake plant is during its active growing season, which typically spans from spring through early summer. During this period, the plant is actively producing new growth and will recover much more quickly from any trimming. For optimal results, timing your pruning with the snake plant’s active growth cycle is crucial. We discuss the ideal seasons and considerations for timing in our articles on when to prune your snake plant and what is the best time to trim a snake plant. It’s also important to consider how often we need to prune our snake plant, as excessive pruning can be detrimental. While spring and summer are preferred for significant pruning, you can address immediate issues like removing dead or severely damaged leaves at any time of the year. However, it’s best to avoid major pruning during the dormant winter months when the plant’s growth slows down, making it more susceptible to stress.
Essential Tools for Safe and Effective Pruning
Using the right tools is paramount for a clean and safe pruning process, both for you and your plant. Here’s what you’ll need:
- Sharp Cutting Tool: A clean, sharp knife, pruning shears, or even sturdy scissors are essential. Sharp blades make clean cuts, minimizing damage to the plant tissue and reducing the risk of infection. Dull tools can crush the leaves, making them more vulnerable to pests and diseases. We’ve outlined the necessary equipment in our guide to what are the essential tools for pruning a snake plant.
- Gloves (Recommended): While snake plant sap is generally considered mildly toxic and unlikely to cause severe reactions, wearing gloves can prevent potential skin irritation for sensitive individuals and keep your hands clean.
- Rubbing Alcohol or Disinfectant Solution (Optional but Recommended): Sterilizing your cutting tools before and after use is a crucial step in preventing the spread of pests or diseases between plants. A quick wipe with rubbing alcohol or a disinfectant solution will suffice.

Step-by-Step Guide to Safely Pruning Your Snake Plant
Follow these steps carefully to ensure a safe and effective pruning experience for your snake plant:
Step 1: Preparation
Before you begin, gather your clean, sharp cutting tool, gloves (if using), and any disinfectant you plan to use. Choose a well-lit area where you have enough space to work comfortably. This will allow you to see the leaves you need to trim.
Step 2: Identifying Leaves for Pruning
Carefully examine your snake plant and identify the leaves that require pruning. Focus on removing:
- Damaged Leaves: Look for leaves that are torn, bent, or have physical damage.
- Yellowing Leaves: Yellowing often indicates overwatering, underwatering, or nutrient deficiencies. Removing these improves the plant’s appearance and can signal underlying issues.
- Brown Tips: While common, excessive browning can be trimmed for aesthetic purposes.
- Wilted Leaves: Wilted leaves can be a sign of dehydration or root problems.
- Diseased Leaves: Look for signs of fungal infections, such as spots or discoloration. Removing these promptly is crucial to prevent the spread of disease.
- Overgrown or Outward-Facing Leaves: If your plant is becoming too wide or has a few excessively tall leaves that disrupt its shape, these can be trimmed.
Knowing what to look for, such as yellowing or damaged leaves, is the first step. For a deeper understanding of potential problems you might encounter and how to identify them, refer to our article on common issues when pruning a snake plant.
Step 3: Making the Cut
Once you’ve identified the leaves to remove, it’s time to make the cuts:
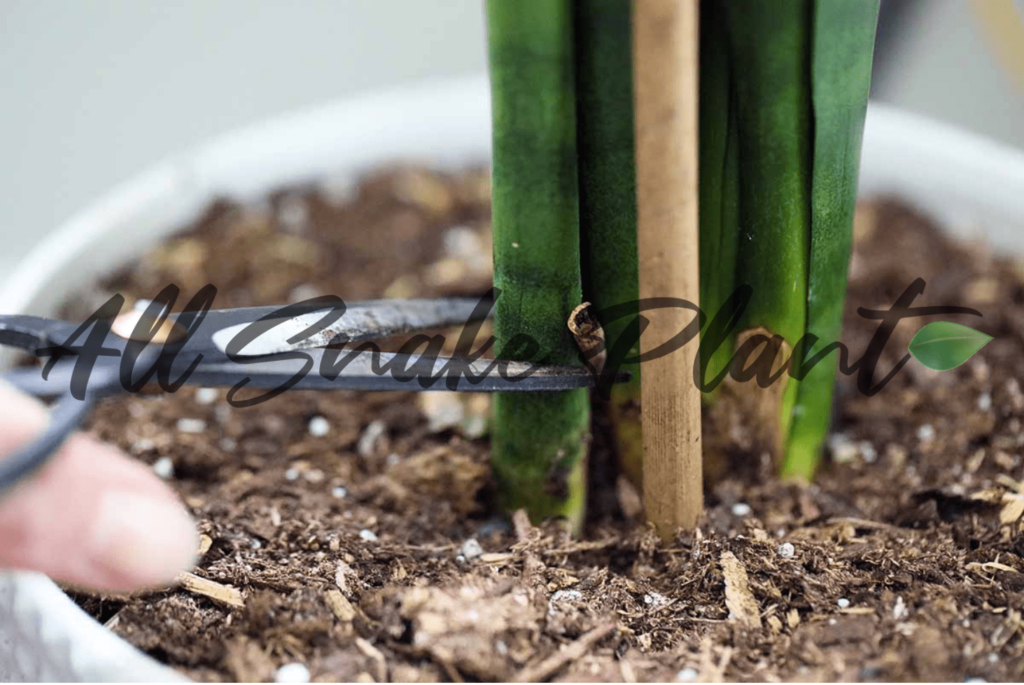
- Locate the Base: Hold the identified leaf and trace it down to where it connects to the soil line or the rhizome (the underground stem).
- Make a Clean Cut: Using your sharp knife, shears, or scissors, make a clean, straight cut as close to the base of the leaf as possible. Avoid cutting into the healthy foliage or damaging the rhizome. A slight diagonal cut might be beneficial as it can help prevent water from pooling on the cut surface.
- Avoid Tearing: Ensure your cutting tool is sharp enough to avoid tearing or ripping the leaf, as this can create wounds that are more susceptible to infection.
Step 4: Propagating from Cuttings (Optional)
One of the rewarding aspects of pruning is the opportunity to propagate new snake plants from the healthy leaves you’ve removed.
- Select Healthy Leaves: Choose firm, healthy leaves for propagation.
- Allow Callusing: Place the cut end of the leaf-cutting on a dry surface and allow it to callus over for a few days. This prevents the cut end from rotting when placed in soil or water.
- Propagate in Soil or Water: You can propagate snake plant leaves in either well-draining soil or water.
- Soil Propagation: Plant the callused end of the leaf cutting about an inch deep in a pot filled with well-draining potting mix. Water lightly and place in indirect sunlight.
- Water Propagation: Place the callused end of the leaf-cutting in a jar of water, ensuring only the cut end is submerged. Change the water weekly. Roots should begin to form within a few weeks.
- Care for New Plants: Once roots have developed (if propagating in water, transfer to soil), care for the new plants as you would a mature snake plant. Proper handling and care of the cuttings after pruning is essential for successful propagation, as discussed in our article on snake plant care after pruning.
Step 5: Post-Pruning Care
After pruning, your snake plant needs a little extra attention to recover smoothly:
- Avoid Overwatering: Refrain from watering your snake plant immediately after pruning. Allow the cut ends to dry further and the plant to settle.
- Monitor for Issues: Keep an eye on the cut areas for any signs of infection or unusual changes.
- Resume Normal Care: After a few days, you can resume your regular watering and care routine.
- Avoid Fertilizing Immediately: It’s generally best to avoid fertilizing your snake plant for a few weeks after pruning to allow it to recover without the added stress of nutrient uptake.
Common Challenges and Tips for Success
While pruning is generally straightforward, here are a few potential challenges and tips to ensure success:
- Over-Pruning: Avoid removing too many leaves at once, as this can stress the plant. Focus on removing only the necessary leaves.
- Infections: Always use clean tools and consider applying a light dusting of cinnamon powder to larger cut surfaces to help prevent infections.
- Variegated Varieties: Be mindful that heavily pruning variegated varieties might affect the variegation of new growth.
Conclusion
Pruning your snake plant is an essential part of responsible plant care that contributes significantly to its health, appearance, and longevity. By following these step-by-step guidelines and understanding the importance of timing and proper technique, you can confidently prune your Sansevieria and enjoy a thriving, beautiful houseplant for years to come. While pruning is generally straightforward, being aware of potential pitfalls can ensure a smooth process. Our article on challenges in pruning a snake plant offers further insights. Happy pruning!
HOW TO PRUNE A SNAKE PLANT (In Short Points)
- Preparation: Gather clean, sharp tools (knife, shears, or scissors) and gloves (optional).
- Identify Leaves: Carefully examine the plant and identify damaged, yellowing, overgrown, or diseased leaves for removal.
- Make Clean Cuts: Using your sharp tool, make clean, straight cuts close to the base of the selected leaves. Avoid tearing.
- Propagate Cuttings (Optional): Allow healthy leaf cuttings to callus over before planting in soil or water to propagate new plants.
- Post-Pruning Care: Avoid overwatering immediately after pruning and monitor for any issues.


