Snake plants, also known as Sansevieria or Dracaena trifasciata, are flexible and low-maintenance houseplants. Repotting is essential to ensure healthy growth, prevent root rot, and refresh the soil. Here’s a comprehensive guide on preparing your snake plant for repotting.
When to Repot a Snake Plant
Snake plants don’t require frequent repotting, but knowing when to do it ensures their continuous health. Look out for these signs:
- Roots growing out of the drainage holes
- Slow growth or wilting leaves
- Soil drying out too quickly
- The pot becoming unstable due to excessive growth
Generally, repotting should be done every 2–3 years.
Choosing the Right Pot
Selecting the appropriate pot is crucial for the plant’s health. Consider these factors:
- Size: Choose a pot that is 1–2 inches larger in diameter than the current one.
- Material: Terracotta or ceramic pots are best as they promote airflow.
- Drainage: Ensure the pot has drainage holes to prevent root rot.
Selecting the Ideal Soil Mix
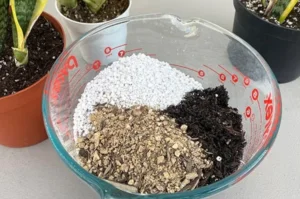
A well-draining soil blend is essential for snake plants. The ideal soil should include:
- Cactus or succulent mix for aeration
- Perlite or sand to improve drainage
- Organic matter like peat moss to retain necessary moisture
Avoid thick or heavy soils that hold excessive water.
Preparing the Snake Plant for Repotting
Follow these steps to prepare your snake plant for repotting:
- Water the plant a day before repotting to reduce transplant shock.
- Gently remove the plant from its current pot by loosening the soil around the edges.
- Inspect the roots for any signs of rot, trimming unhealthy roots with sterilized scissors.
- Allow the plant to dry for a few hours if there are any cuts to prevent infections.
Steps to Repot a Snake Plant
- Fill the new pot with a layer of fresh, well-draining soil.
- Position the plant in the center, spreading the roots gently.
- Add more soil around the roots, pressing lightly to secure the plant.
- Water sparingly, allowing the soil to settle.
- Place in indirect light to help the plant adjust to its new environment.
Common Mistakes to Avoid
- Using the wrong pot size: A pot too big can retain excess moisture.
- Overwatering: Water only when the soil is dry to the touch.
- Not trimming damaged roots: Always remove any rotten or mushy roots.
- Repotting too frequently: Only repot when necessary to avoid stressing the plant.
Post-Repotting Care
After repotting, follow these care tips to help your snake plant thrive:
- Avoid watering for a few days to let the roots settle.
- Keep the plant in indirect light for at least a week.
- Monitor for stress signs, such as yellowing leaves.
- Resume normal watering and fertilization after two weeks.
Frequently Asked Questions (FAQs)
Can I divide my snake plant while repotting?
Yes! You can propagate it by separating healthy rhizomes into smaller plants.
What happens if I don’t repot my snake plant?
It may become root-bound, leading to slow growth and potential health issues.
Can I repot my snake plant in winter?
It’s best to repot in spring or summer when the plant is actively growing.
Conclusion
Repotting your snake plant is a simple yet essential task to ensure its continuous growth and health. By choosing the right pot, using well-draining soil, and following proper repotting techniques, you can keep your snake plant thriving. Follow post-repotting care instructions to help your plant adjust, and enjoy its lush greenery for years to come!